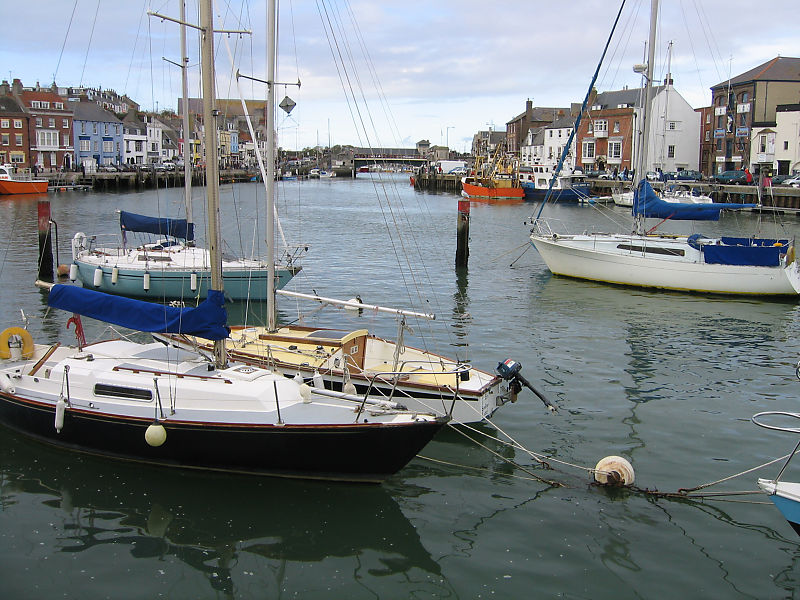
In this tutorial, we will show you how to create a panorama photo using multiple exposures. When photographing a wide view the final result can often fall short of expectations due to not being able to capture the whole scene. In this example, a shot of Weymouth harbour, I used a 35mm lens which only managed to capture the central area of the view. This is a complicated view as it contains many fine details in the foreground boats as well as the distant views of the harbour.
Capturing the image
The solution is to create a panorama using several exposures and then stitch and blend the images together using image editing software. In the sample below I used four shots for the first panorama and six shots for the second 180° version


There are two ways to capture images that are ready to convert to a panorama. First method, shoot in the horizontal mode. Depending on the lens in use, you can capture the view in two to four shots. I would suggest using a semi wide angle lens such as a 35mm. An extreme wide-angle lens 14 – 18mm can produce distortions at the edges, which can result in a panorama stitch blend being less than perfect. My 35mm lens was not wide enough to capture the entire scene, so I used four shots for the first panorama and six shots for the full 180° second version.
The second method is to use your camera in the vertical position and capture the view in six to twelve shots, the shot below comprises of six photos. This method will produce more detail in the panorama, ideal if you are printing the final result on a large format printer. Using a 50mm or short telephoto 70mm lens, will eliminate any optical distortions and give the panorama a more natural look. Look through the viewfinder or LCD screen and make sure that images overlap at the edge by approximately 20 to 25% and take as many pictures as necessary to capture the entire view.


The final landscape render was further enhanced by adding a small amount of saturation in the blue sky and some contrast adjustment to emphasise the clouds. The power cables on the right hand corner were removed with the retouch brush.
Recommended equipment is a sturdy tripod with pan tilt or ball and socket head. Personally, I prefer to use a dedicated video pan tilt head which is suitable for both stills and video work.
Mount your camera on the tripod and ensure that it is level using the spirit level on the tripod, or if your camera has one, use the camera built in level display. Work out the area you want to capture, starting on a left to right sweep ensure the camera is level throughout the sweep.
Select Manual mode and work out an exposure, ideally a spot meter reading from a neutral area will produce the best results. If you are using the Program or Auto mode then the camera may compensate too much for variations in light levels, this can produce an un-natural looking final result. Generally, an aperture of f8 or f11 is sufficient to produce an extended depth of field to ensure everything is in focus. Use a low ISO value of 100 or 200 to eliminate or reduce any noise, depending on the light level you may have to use a slow shutter speed. Reduce vibrations by using a cable release or remote control, if you haven’t got either, then use the cameras self timer to fire the shutter, a timer duration of 2 or 5 seconds will be sufficient. Focus the camera on the view and then lock the focus. If there is movement such as clouds then try to capture all the images as quickly as possible, especially if the sun is ducking in and out of the scene. Now you are ready to create a panorama photo.
Stitching the images together
For my shots I have used JPEG files, for more detailed work you may want to shoot in RAW format, but be aware that RAW files are generally very large and can make heavy demands on processing the files

I tried to stitch both series of pictures with Affinity and Photoshop. The end results were quite different. Photoshop and Affinity had difficulty with aligning the mast correctly in the harbour panorama. For the final image I used ON1 PhotoRaw it also produced the fastest render.
For the landscape I used Affinity Photo and On1 Photo RAW, both applications produce excellent results. Affinity provides a preview of the final scene and provided a very fast final result. ON1 Photo Raw has an option to auto crop the image. This removes any blank areas.
There are a number of dedicated panorama creation software packages. I will look at these in greater detail in a future article.
Leave a Reply